Perpendicularity in GD&T can mean two very different things depending on which reference feature is called out. The normal form or Surface Perpendicularity is a tolerance that controls Perpendicularity between two 90° surfaces, or features. Surface Perpendicularity is controlled with two parallel planes acting as its tolerance zone. Axis Perpendicularity is a tolerance that controls how perpendicular a specific axis needs to be to a datum. Axis Perpendicularity is controlled by a cylinder around a theoretical perfectly parallel axis. Pay close attention if a hole or pin is referenced since axis perpendicularity is commonly called out on these features.
GD&T Symbol: 
Relative to Datum: Yes
MMC or LMC applicable: Yes
GD&T Drawing Callout:
Surface Perpendicularity:

Axis Perpendicularity:

Description:
Surface:
Perpendicularity is a fairly common symbol that requires the referenced surface or line to be perpendicular or 90° from a datum surface or line. Perpendicularity can reference a 2D line, but more commonly it describes the orientation of one surface plane perpendicular to another datum plane. The tolerance of the perpendicularity callout indirectly controls the 90° angle between the parts by controlling the location where the surfaces have to lie. See the tolerance zone below for more details.
Note: Perpendicularity does not control the angle of the referenced feature –the tolerance is in distance units. (mm/in)
Axis:
Axis control can also be called out for Perpendicularity and is one of the more common forms of axes call outs. When it is referenced for a circular feature, the feature control frame will contain the diameter (Ø) symbol. Axis Perpendicularity can be applied to a positive feature (pin/boss) or to a negative feature (a hole). When Perpendicularity is referenced for axial control of a feature, the symbol now specifies a cylindrical boundary where the axis of the referenced feature must lie. This cylindrical boundary is formed by taking a line that is directly perpendicular to the datum feature. When this version of Perpendicularity is called out it is to be used with maximum material condition to enable easy gauging of the part. See example 2 below for how these particular parts are gauged.
GD&T Tolerance Zone:
Surface:
Two parallel planes or lines which are oriented perpendicular to the datum feature or surface. The planes are held perpendicular to the datum, but only ensure that the entire feature falls into the tolerance zone.
Remember: Perpendicularity does not directly control the angle of the referenced surface; it controls the envelope (like flatness) where the surface needs to be.

Axis:
A cylinder surrounding a referenced theoretical axis which is directly perpendicular to the datum feature. The tolerance zone is the diameter of this symbol in which the central axis of the measured feature must lie.
Gauging / Measurement:
Surface:
Perpendicularity is measured using a height gauge, similar to flatness, however, the gauge (or part) is locked to a 90° datum to measure how perpendicular the surface is. The entire surface has to be measured if it is a flat feature.

Axis:
To ensure that a part or feature is axially perpendicular, Maximum material condition is most often called out on axis perpendicularity to allow easy measurement with a gauge. This allows it to be designed for either a negative (hole) or positive (pin) feature and can take into account a bonus tolerance.*
Gauge size for an internal feature (like a hole):
Gauge Ø (pin gauge)= Min Ø of hole (MMC) – Perpendicularity Tolerance
Gauge size for an external feature (like a pin):
Gauge Ø (hole gauge) = Max Ø of pin (MMC) + Perpendicularity Tolerance

See Example #2 below for a good example Axis Perpendicularity using MMC.
*Note on Bonus Tolerance:
When a functional gauge is used for Perpendicularity, any difference the actual feature size is from the maximum material condition would be a bonus tolerance. The goal of a maximum material condition callout is to ensure that when the part is in its worst tolerances, the orientation and size of the hole/pin will always assemble together. This means that if you make a pin smaller, you make more bonus tolerance for yourself. This bonus can be added to the GD&T tolerance and would widen the perpendicularity tolerance.
Bonus Tolerance = Difference between MMC & Actual condition (See Example 2 Below)
Relation to Other GD&T Symbols:
Surface:
Perpendicularity is a specific form of Angularity at 90°. All of the orientation symbols (Angularity, Parallelism, and Perpendicularity) all call out the particular feature envelope referenced to a datum.
The Perpendicular Symbol is also closely related to flatness when referenced/measured surface is a surface plane. When you call out Perpendicularity, flatness is implied (you are measuring a surface variation between two parallel planes = Flatness) Perpendicularity is always measured with respect to a datum, where flatness is not.
Axis:
Perpendicularity is closely related to all the other orientation GD&T symbols when called on an axis. The tolerance zone now refers to the uniformity and cylindrical envelope of a central axis. Perpendicularity and Parallelism can be called out on holes and cylindrical pins, often with MMC added.
When Used:
Surface:
Whenever two surfaces needing a constant 90° angle, Perpendicularity is effective. Flange bearings and critical square edges usually reference it. Perpendicularity is also commonly called out on the corners of cylinders where the flat bottom must be perpendicular with the curved sides.
Axis:
Perpendicularity is very commonly called out on the center axis of a hole. Almost always, your hole needs to be perpendicular to the surface it is drilled into. When this is the case, it is called out alongside MMC to ensure that if a pin or bolt needs to be inserted into this hole, the part can enter the whole perpendicular at and always fit in. See example 2 for this explanation.
Surface Perpendicularity Example:
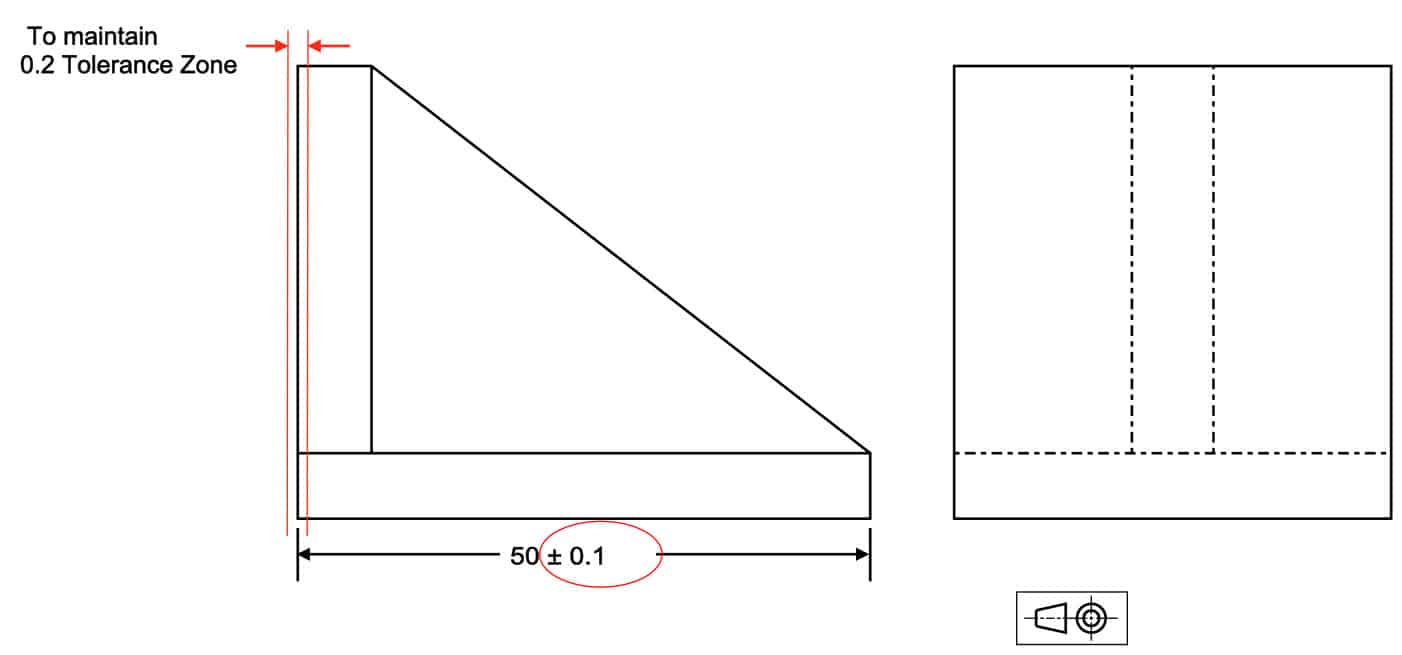
The edge of a stopping block for a rail must form a 90° to ensure proper mating contact takes place. The base of the block is will be our datum and the face where the stopping block makes contact is our referenced surface. To ensure that this face is always perpendicular and flat to make good contact, you would need to both tightly control the angle and the dimensional width of the part.
Ensuring perpendicular/flat surfaces without GD&T symbol
With perpendicularity, you can open up the width dimension and control the face’s angle containing the part very tightly. Your tolerance zone remains the same, but your part is now easier to control and fabricate.
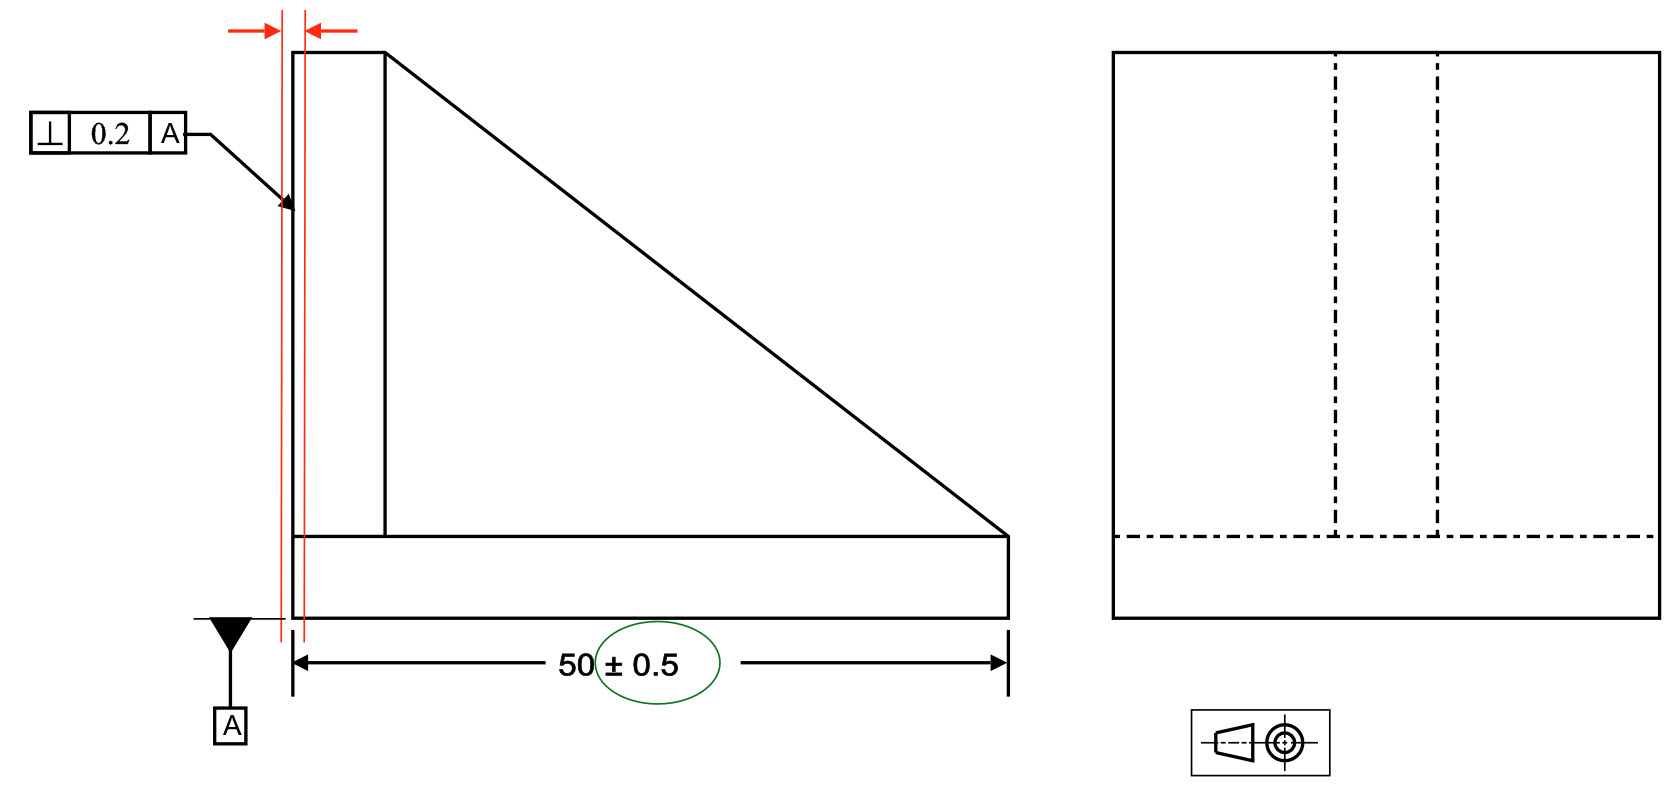
Controlling the perpendicularity with GD&T symbol.
Axis Perpendicularity Example with MMC:
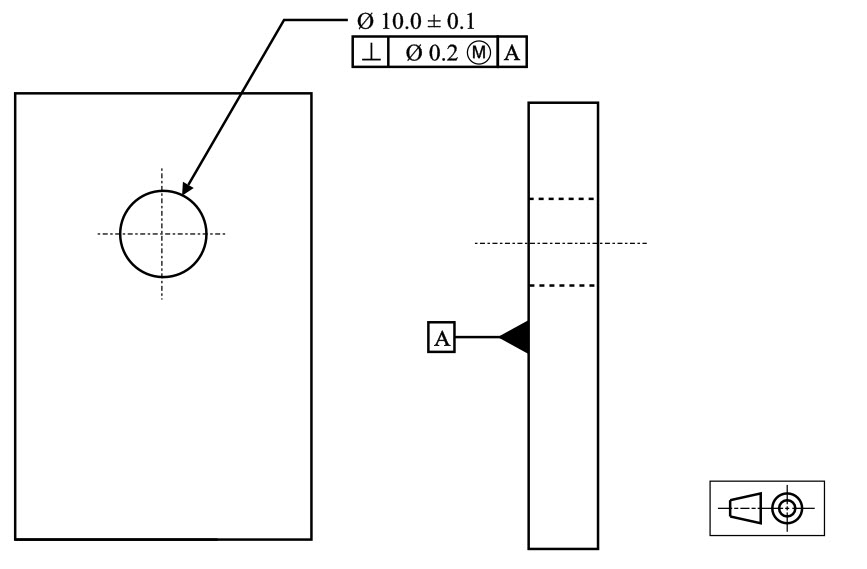
If you have a critical hole feature that needs to remain parallel to the surface that is formed into, perpendicularity can be called out to ensure that the hole is straight. In this example, a bolt hole is specified to remain perpendicular to its surface.
Perpendicularity on a hole under MMC
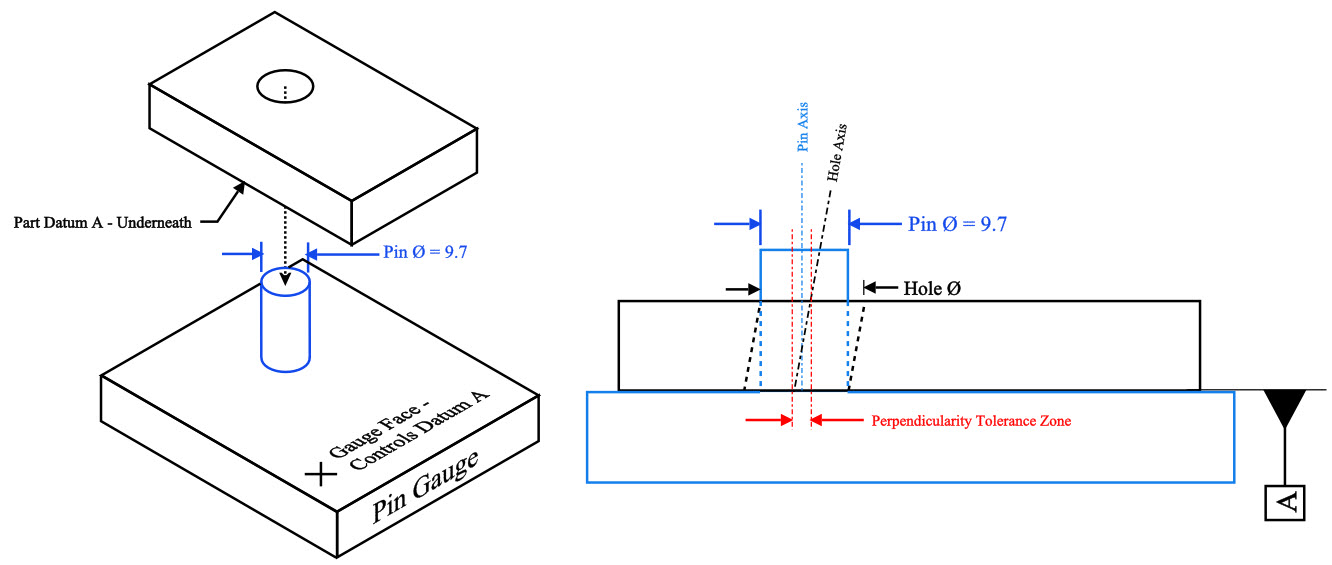
Without an MMC callout, you would need to control just the center axis of the hole and measure it to ensure it is at 90° to the bottom surface. However, when MMC is called out on the print, you are controlling both the size and the orientation of the hole. You now can check both tolerances using a functional gauge with the following dimensions:
Formula for a perpendicularity functional gauge:
Gauge Ø (pin gauge) = Min hole Ø – Perpendicularity Tolerance
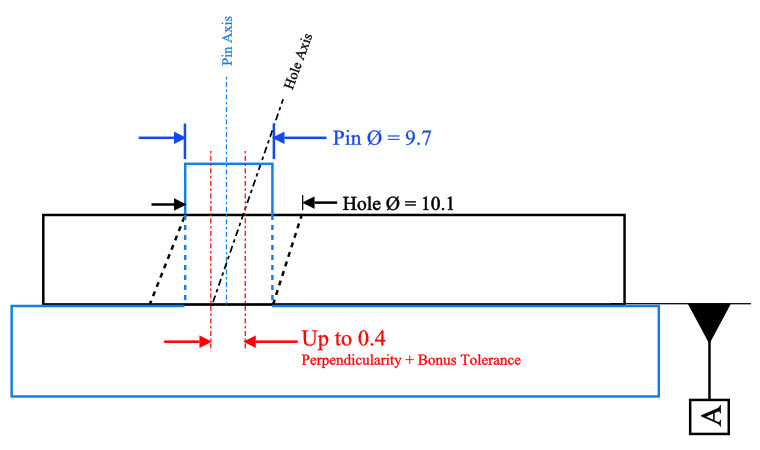
Gauge Ø = 9.9 – 0.2 = 9.7
Hole Ø + Hole Perpendicularity > 9.7 (Pin Ø) to be in spec.
Due to the Max Material Condition callout, if you have a hole that is larger than the MMC of 9.9 you will have bonus tolerance that can be added on to your perpendicularity. (According to print Hole Ø cannot be above 10.1 though)
In the example below – the hole is at the least material condition (largest hole size) with the hole at the LMC, your bonus tolerance that can be added to the perpendicularity is calculated as follows:
Bonus Tolerance = Actual Part Size – Max Material Condition
Bonus Tolerance = 10.1 – 9.9 = 0.2
Adding this bonus tolerance to your perpendicularity means your “gauged” perpendicularity tolerance can go up to 0.4 when the part is at its largest diameter.
Final Notes:
Very Common:
Perpendicularity is very common in its surface and axis form. You will see this commonly on many mechanical engineering drawings.
Features of Size:
Perpendicularity will most likely have an MMC or LMC callout if gauge control is used in a production environment. It allows both size and orientation to be measured quickly on the line, as opposed to having to measure perpendicularity with a CMM.
Axis Controls:
Straightness, Axis Angularity, Axis Parallelism, True Position, and Axis Perpendicularity can all be called out to control a center axis. Usually, when this is a case in a production environment, MMC is also called out so that a functional gauge can be used. However, the only callouts with this case that you would see commonly are perpendicularity and straightness.


إرسال تعليق